I’ve been creating applications for a long time and more often than not, there’s been a requirement for some level of security. This ranges from data in transit to data at rest as well as relevant authorisation. In most cases, this functionality has been provided out the box and when it came to authentication, anything more than the implementation of a simple membership provider has been someone else’s issue.
I’ve done a bit of playing around with Azure Active Directory (AAD) but nothing significant enough for me to classify it as a skill. In other words, most of the time I’d be guessing…
However, having a service that does the heavy lifting for me is alluring. When I start thinking about multifactor authentication, oAuth and oAuth Delegation, policies (and the list goes on), it seems that AAD is an easier option. When you’ve been trying to get an application out the door as quickly as possible and with least amount of effort while maintaining it’s integrity, easy (and battle tested) is good.
So, on to it. Hopefully, my learnings can make your life a little easier and I can save you the effort of trawling through all the documents and videos out there to get you up and running as quickly as possible.
Azure Active Directory vs. Microsoft Identity Platform
I start with “What is Azure Active Directory?”, and almost the first paragraph on Microsoft docs brings up Microsoft Identity Platform (aka. Azure Active Directory for Developers).
“Sheesh!” you say. “I’ve only just started and it’s changed already!” (I hear ya!…)
Keep calm and carry on! This seems to be nothing more than marketing that’s meant to make AAD more appealing to developers. As far as I can tell, there’s nothing new insofar as AAD is concerned but it does provide some handy SDK’s and libraries that help leverage AAD within your application (for a number of plaftforms and languages)

Moving on…
What is Azure Active Directory in a Nutshell
The first thing you’ll want to do, before you go any further is skim over some of the terminology related to AAD - take a look through this table
AAD is Microsoft’s cloud-based identity and access management service. This post focuses on the applicability of AAD to bespoke software access - in the forms of Authentication and Authorisation. However, AAD can handle a number of other things including Office365, external and internal resources, etc. You can see more here.
Okay, so using AAD I can esure that only specific people can access a resoure (Authentication) and can only perform actions they are allowed to (Authorisation).
Why would I use Azure Active Directory
AAD is not your only option when thinking about Authentication and Authorisation. Azure hasn’t always been around and there are on-prem options available as well as options available from other cloud providers such as Amazon and Google Cloud.
Identity and access management can be a complex domain and while I haven’t setup something like this from scratch myself, I can’t say I’d want to. I enjoy building apps; I enjoy writing code. Sometimes my apps need to be secure and that security needs to be reliable, always available and compliant. I want to be able to incorporate these elements into my application as quickly as possible with the least amount of friction.
I’m sure other cloud providers are equally as capable but I am more familiar with the Microsoft stack so I’ll just go with that - justification enough for me.
I need to specifically mention Yaser’s blog here - An excellent resource and I’ve probably used it a few times when I’ve got stuck. In particular, he’s got a great post on using Azure B2C as your identity manager.
Setting up an AAD Tenant
Before we even get going, I need to ensure I have an AAD tenant that I can work against (wondering what this is? - Take a look at the aforementioned table ;) ).
Then, follow the steps here to setup the tenant.
I’ve setup my tenant with the following details:
Organisation: burhaantargett
Initial domain name: burhaantargett.onmicrosoft.com
Testing out Azure Active Directory Authentication using Postman
Following the instructions on setting up AAD is a simple process. However, before moving on I’d like to make sure that everything so far works as expected so I dont (later) start hunting down phantom authentication errors in code.
As such, at this stage I want to test, independant of code, and Postman is a useful otion.
All I want to do at this stage it successfully make a call to AAD with a username and password and receive a token back.
Registering Postman
For any application to be able to communicate with AAD, it needs to be registered.
Why do application need to be registered you ask? Take a read of this
Registering your application (Postman in this case) is a simple process:
- Navigate to
Azue Active Directorywithin the Azure Portal - Click on
App registrations - Click on
New application registration
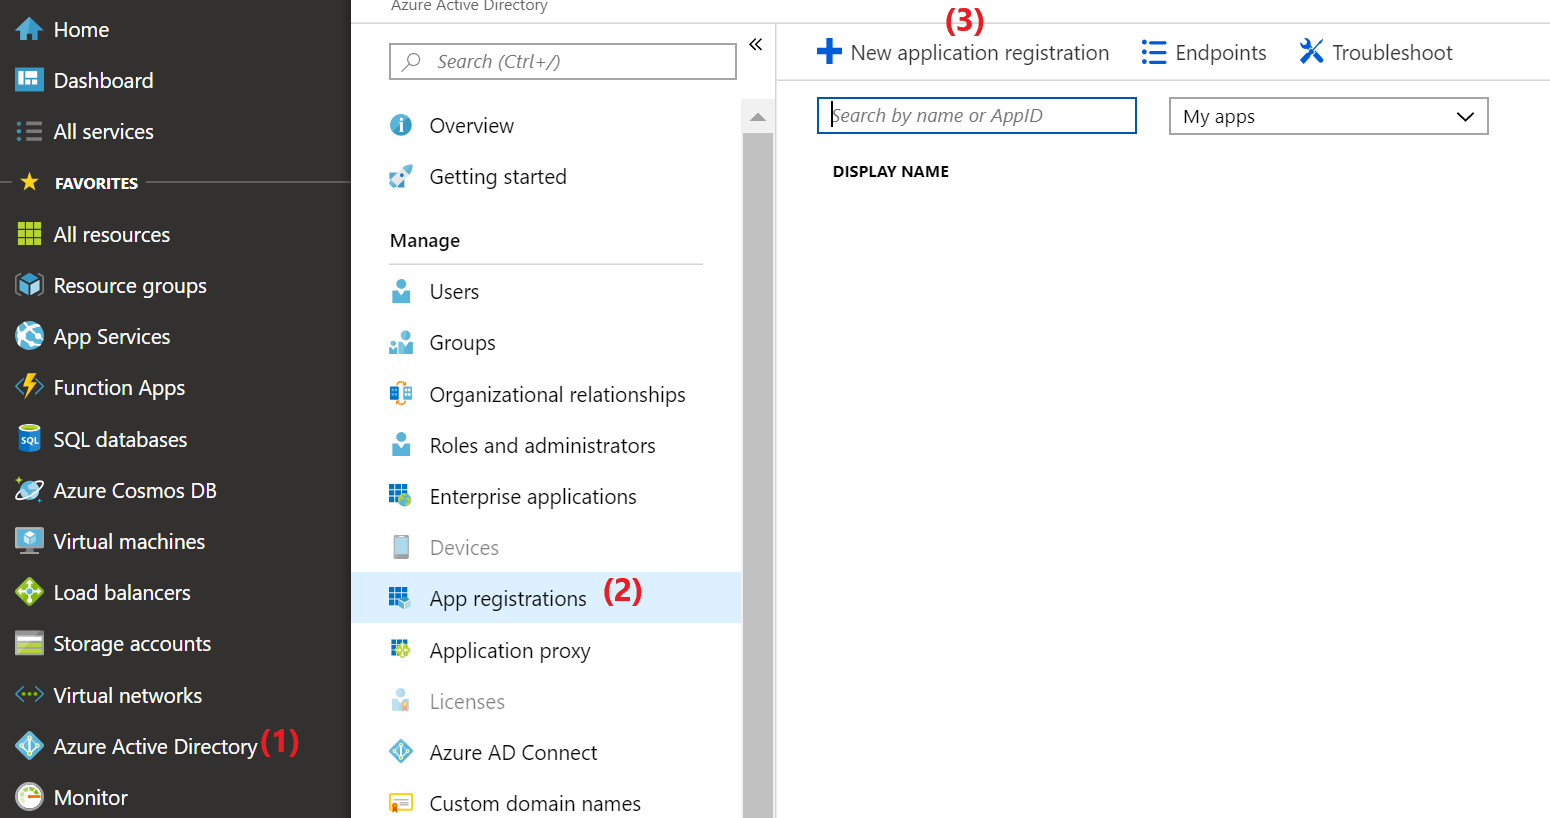
When adding the application in our case, note that you must select Web app / API and NOT Native. The reason for this is because of security concerns for public clients and the keys property was removed for native applications - See more details here
- Complete the application details - the
Sign-on URLwhen creating the application can behttp://localhost.
At this stage, lets records some details that we’ll need when calling AAD using postman:
- Tenant ID:
Azure Active Directory>Properties>Directory ID - Client ID:
Azure Active Directory>App registrations> your app >Application ID - Client Secret:
Azure Active Directory>App registrations> your app >Settings>Keys> Create a new key that never expires and copy the value
Testing Postman
If you don’t want to follow the steps below, you can execute the request by using the request I’ve created 
Having recorded the values in last step above, open Postman and create an environment for your project.
Create the following variables in your environment and populate them with the details you’ve recorded (if you’re not sure how to do that, see this)
- clientID
- clientSecret
- tenantID
Now, create a new POST request to https://login.microsoftonline.com//oauth2/token
Under each of the following tabs, ensure the values are as indicated.
Authorization
Type: OAuth 2.0
Add authorization data to: Request Header
Body
Ensure x-www-form-urlencoded is selected then set the following key/values
- grant_type : client_credentials
- client_id:
- client_secret:
- resource: https://management.azure.com
Headers
Set the following key/value header
- Content-Type: application/x-www-form-urlencoded
Tests
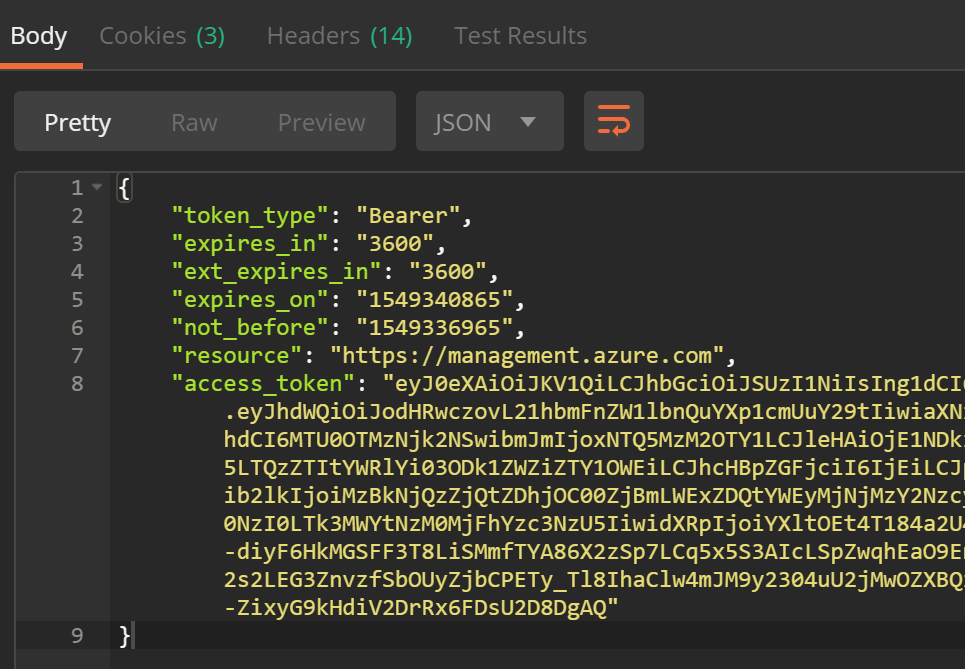
Finally, we’ll want to record the Token value somewhere. Copy the following into the code window
var json = JSON.parse(responseBody);
postman.setEnvironmentVariable("bearerToken", json.access_token);
Now, if you hit SEND, you should receive an access token back!
This post is continued in Part 2
Additional Resources
- If you’re looking for specific developer tutorials, take a look here
- A really simple tutorial on setting up Postman to use Azure Active Directory
- Digitals Ocean’s Introduction to OAuth
- Yaser’s post on Using Azure B2C as your identity manager